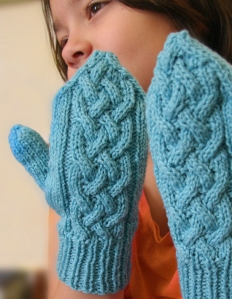
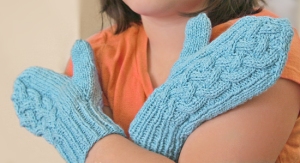
Cabled mittens are complete! My daughter loves her new mittens so the project is a success. However, I’m not crazy about this yarn as a mitten. It has a shine and a drape instead of the usual fuzziness that lets you know a mitten is going to be toasty.
But, I did use up some of my leftover sweater yarn. Also, I learned a bit more about cables and how to add and subtract extra stitches required for those beautiful things. I’m planning on using my new pattern to knit up some mittens in a fuzzier yarn.
Directions:
For those who would like to replicate, I used a sport weight yarn and a size 3 needle. I am a loose knitter so I always move to a smaller needle. The gauge is 5.5 stitches per inch in stockinette. It produced mittens for a girl or small woman’s hand (3.4 inches across or 6.75 inches around).
Using circular needle, CO 32 st. Move half of stitches onto another circular needle. Join and 1×1 rib for a few inches or approximately 18 rows.
Set Up Round
first needle (thumb): k2, m1, pm, k2, pm, k till last 2 st and m1, k2
second needle (cable): k2, m1, [k2, m1]2 times [k1, m1] 6 times, k2, m1, k2
Thumb Gusset
first needle (thumb): Knit across first needle, slipping markers when reached.
second needle (cable): k4, begin pattern across next 18 stitches, k4
first needle(thumb): k to marker, slip marker and m1, k to next marker, m1 and slip marker, k to end.
second needle (cable): k4, knit pattern across next 18 st, k4
Repeat these 2 rounds until the gusset reaches the base of the thumb or the web of skin between thumb and forefinger, approximately 9 repeats of these 2 rounds.
first needle (thumb): k to marker, remove marker and put all thumb sts on scrap yarn, CO 2 sts, remove marker, k to end of needle
second needle (cable): k4, k in patt across next 18 sts, k4
Hand
first needle: k across
second needle: k4, k in patt across next 18 sts, k4
Repeat this round until mitten covers pinkie, approximately 22 rounds.
Reducing and Closing Hand
first needle: k1, SSK, k until last 2 sts, k2tog, k1 (16 st)
second needle: k1, SSK, k1, k in patt across next 18 sts, k1, k2tog, k1 (24 st)
first needle: k across
second needle: k3, k in patt across next 18 st, k3
first needle, k1, SSK, k until last 2 sts, k2tog, k1 (14 st)
second needle: k1, SSK, k in patt across next 18 st, k2tog, k1 (22 st)
first needle: k across
second needle: k2, k in patt across next 18 st, k2
first needle, k1, SSK, k until last 2 sts, k2tog, k1 (12 st)
second needle: k1, SSK, k in patt across next 16 st, k2tog, k1 (20 st)
first needle: k across
second needle: k2, k in patt across next 16 st, k2
first needle, k1, SSK, k until last 2 sts, k2tog, k1 (10 st)
second needle: k1, SSSK, k in patt across next 12 st, k3tog, k1 (16 st)
first needle: k across
second needle: k1, SSK, k in patt across next 10 st, k2tog, k1 (14 st)
first needle, k1, SSK, k until last 2 sts, k2tog, k1 (8st)
second needle: k1, SSSK, k in patt across next 8 st, k3tog, k1 (12 st)
first needle: k across
second needle: k1, SSK, k in patt across next 6 st, k2tog, k1 (10 st)
first needle, k1, SSK, k until last 2 sts, k2tog, k1 (6st)
second needle: k1, SSSK, k in patt across next 4 st, k3tog, k1 (6 st)
Use Kitchener’s Stitch to graft the two sides together.
Thumb
Move thumb stitches off holder and onto 2 circ needles. Pick up the 2 CO sts and any extra sts needed to close gaps. Just remember to reduce (using k2tog) on subsequent rounds the number of extra sts picked up.
K across all sts until thumb covers actual thumb, approximately 15 rounds.
k2tog all around for 2 rounds. Cut yarn with 6 inch tail. Use needle to thread tail through remaining sts. Pull tight and weave in end.
Other Mitten
The next mitten is worked exactly like the first with the exception of the thumb placement. The thumb set up will be on the opposite side so the set up round will be:
first needle (thumb): k2, m1, k till last 4 st,pm, k2, pm, and m1, k2
Pattern
All odd rounds (1,3,5,7 &9): p2, k14, p2
round 2: p2, [k2, p1] 4 times, k2 p2
round 4: p2, k2, [p1, FC] 2 times, p2
round 6: p2, [k2, p1] 4 times, k2, p2
round 8: p2, [BC, p1] 2 times, k2, p2
round 10: p2, [k2, p1] 4 times, k2, p2
FC (Front Cross): slip 3 sts to cable needle and hold in front, k2, then slip the left st on cable needle back onto left needle and purl, then k2 from cable needle
BC (Back Cross): slip 3 st to cable needle and hold in back, k2, then slip the left st on cable needle back onto left needle and purl, then k2 from cable needle.


They look great!
LikeLike
Great looking mittens! I can’t even plait that pattern, it would be great to knit it….
LikeLike
Such nice work – they look great. I am such a big fan of cables. One of my favorite types of knitting.
LikeLike
Thanks! It took me a while to actually try cables because they seemed so intimidating but now I love them. And, I really love the red cable and lace sweater you are working on. I’m going to have to try a cable/lace mix in the near future!
LikeLike
Highly recommended! Although I did have to rip back 3″ of work recently since i forgot to cross one of the set of cables. Oh well, such is the life of a knitter 🙂
LikeLike
These look really snug and cosy. I like cable but have not attempted any for such a long time.
LikeLike
Cables are beautiful but I definitely have to be in the mood for them to take them on. 🙂
LikeLike